Although I can assure you I didn't make the food our guests ate or the dress I wore at our wedding, nearly everything else was fair game. I had a lot of fun creating the unique and meaningful aspects of our wedding and saved a lot of money by doing it myself.
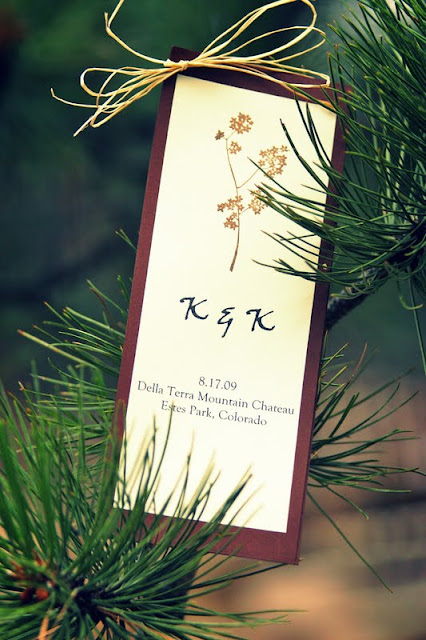
I made each of our 15 table numbers out of craft paper and raffia from Hobby Lobby. I saved money by waiting until their specialty paper went on sale every couple of weeks. That way, I bought what I needed and if I ran out, I waited to purchase more when it was again discounted at 50% off. (This added up when you consider each piece of paper was at least $1.00.) I printed off the numbers using our home printer, made all my cuts with Kinkos paper cutters to save time, and chose a branch stamp to tie in with the earthy feel of our wedding. They stood, open like a book on each table to show our guests to their seats.
I made each of our 15 table numbers out of craft paper and raffia from Hobby Lobby. I saved money by waiting until their specialty paper went on sale every couple of weeks. That way, I bought what I needed and if I ran out, I waited to purchase more when it was again discounted at 50% off. (This added up when you consider each piece of paper was at least $1.00.) I printed off the numbers using our home printer, made all my cuts with Kinkos paper cutters to save time, and chose a branch stamp to tie in with the earthy feel of our wedding. They stood, open like a book on each table to show our guests to their seats.
I used the same paper, raffia and stamp to make the ceremony programs for our guests. Each program was three pages so this is where waiting for the paper to go on sale really paid off. This was by far the longest and most tedious of all my wedding projects. 120 guests meant 120 programs meant a LOT of cutting, taping, hole punching, stamping, and tying.
The place cards matched our invitations which I ordered online. These mini terra-cotta pots (bought in bulk from Big Lots for CHEAP) served as both the place cards as well as the guest favors. Each one had an organza pouch full of wildflower seeds (ordered by the pound, again from this website) and a flower pick which held the name cards. I bought green floral arranging styrofoam, cut it into small squares and pushed it to the bottom of each pot. Then I bargained with a local flower shop owner to sell give me 150 picks (the ones that hold the card when you send flowers to someone) and I stuck them in the foam so they would stand straight.
I needed a way for the caterers to easily identify each guest's meal choice (chicken, steak or vegetarian) when they served dinner, so I tied raffia around the pots to mark steak and yellow ribbon on the pots to mark vegetarian. Those who chose chicken were left plain. I gave my color key to the caterer in advance to avoid confusion the day of.
I loved the idea of cupcakes because it allowed us to have several flavors for guests to choose from. The small cake on top was for Keane and I to cut so we could still follow tradition. I made the cupcake stand out of sturdy cardboard which I spray painted brown. I then finished the edges by gluing ribbon around the perimeter.
I bought extra vases and apothecary jars at Home Goods and filled them with lemons, cinnamon sticks and feathers. My family scattered them around the reception hall for even more DIY natural decor.
Keane and I had a year and a half to plan our wedding. I found that by starting early and purchasing items over the course of several months rather than all at once, I never stressed over time or finances. Friends and family would ask how I was handling wedding planning and my response was always the same: I loved being a bride-to-be. I loved preparing for our wedding while keeping in mind the real purpose of that day. I enjoyed dreaming and creating, and the sense of accomplishment that came as I checked things off my list, one by one.
I told Keane after it was all done that I wanted to do it again and again without changing a thing because it was perfect and beautiful. Sure, not everything went exactly the way it was supposed to. The boutonnieres weren't at all what I ordered, our video of childhood pictures displayed our wrong birthdays, and we had to cut the ceremony short because it was threatening rain. But none of that mattered because we were finally there, in the middle of moments that we had waited on for so long.
And all we could do was smile.
Check out part 1 of this post here for more DIY ideas to create an elegant wedding on a budget!
I told Keane after it was all done that I wanted to do it again and again without changing a thing because it was perfect and beautiful. Sure, not everything went exactly the way it was supposed to. The boutonnieres weren't at all what I ordered, our video of childhood pictures displayed our wrong birthdays, and we had to cut the ceremony short because it was threatening rain. But none of that mattered because we were finally there, in the middle of moments that we had waited on for so long.
And all we could do was smile.


No comments:
Post a Comment